Friday, December 16, 2011

Gift Bow

I remember when I was younger I would always take the bows off of my presents and put them on my head. Okay, I confess. I still do this now at age 28.
Here is a quick way to make your own bows for all those presents you are wrapping this Holiday Season.
To make this 4 inch bow I cut four strips of ribbon 8 inches long, two strips that are 6 inches and one that is 2 inches. I used 7/8"  red saddle stitch grosgrain ribbon.
Loop the ribbon into a thin figure 8 shape. You will want the tips to come to somewhat of a point. Use a drop of hot glue to hold it in place.
Do the same with the remaining 8 and 6 inch strips. Make a ring with 2 inch strip.
Take 2 of the larger figure 8s and using a drop of glue in the middle make them into an X.  Repeat. Then do the same with the two smaller  figure 8s.
Begin to stack them and glue them together with the points facing towards the open spaces from the layer below.
Put one  more dab of glue in the center and place the ring/loop inside.
This bow could be attached onto a gift box just the way it is but because I like to find multiple uses for the things I make I added a lined hair clip to the back.
Now the recipient has a special hairbow to wear as a bonus gift or they can save the bow to reuse the next time they have a gift giving occasion.

Friday, December 9, 2011

Ribbon snowman

The supplies needed to make this cute little snowman are 3/8″ white grosgrain ribbon for the snowman body, 3/8″  brown for the arms, 5/8″ and 3/8″ black for the hat, 3/8″ ribbon of whatever color or design you would like the scarf.  I also used a thin white and silver ribbon to add some detail to the hat.  You will also need a glue gun, lighter, and whatever you would like to use your snowman on. I attached it to clothespin with a magnetic strip glued to the back so it can be used on the refrigerator.
To make the body cut 7  strips of white ribbon. Each strip should be a little bit smaller than the one before.  Glue each strip into a loop by overlapping the ends and gluing it into a ring or O shape. Use the largest loop for the body of the snowman and the second largest loop for the head. Place the other loops inside of each other. There should be a total of 4 loops for the bottom and 3 for the head. Hold it all in place by one drop of glue between each loop. The snowman body is now complete.  I then wrapped one small piece of ribbon around the center for extra support and to cover where all the loops were connected.
To make the scarf  wrap one ribbon around the neck making a loop with the overlapped ends towards the back. With a second strip of ribbon I cut the ends into a “dove tail”.  The easiest way to do this is to fold the ribbon in half lengthwise and cut in an angle from the folded side back to the ends giving a perfect V shape.  Fold the ribbon like you are making an awarness ribbon and glue it in place.
The arms are a 3/8″ brown ribbon cut in half lengthwise and then heat sealed with a lighter to keep it from fraying and then glue them to  the back of the snowman.  You can also heat seal the ends of the scarf if you wanted. If you don’t they will fray, but that is totally fine because it will end up looking like fringe on the end of the scarf and that would be really cute too!
To make the hat cut a small piece of 5/8″ black, heat seal, and then glue a 3/8″ strip on top to make the brim of the hat. I then glued on a small strip of decorative ribbon to add a little sparkle.
Then glue the hat on the snowman either right on top or off at an angle and you have a very adorable little snowman.
I glued a strip of the white ribbon onto a clothespin and then glued a magnetic strip to the back so it could be hung on the refrigerator. Other options are to glue the snowman onto a lined hair clip or attached to a wire or hanging ribbon to hang on the tree as an ornament.   You can use the snowman instead of a traditional bow on a present or clip it to a gift card to give to those hard to shop for people.

Friday, December 2, 2011

Decorated Formula Cans

I have recently finished breastfeeding my baby girl. We only made it 7 months but that was a huge accomplishment for me. Not only did I love doing it; I loved the money I saved. Now that we are using formula full time we have a lot of empty cans. Luckily, these cans can be used for so many things!
Supplies Needed:
  • empty formula can
  • a few different  ribbons
  • scissors
  • lighter
  • E-6000 glue (or a hot glue gun)
Step 1:
Peel the paper off the can and wash it out. Do not put it in the dishwasher.  Dry it very well or it will rust.
Step 2:
Chose the pattern in which you would like on the can. I am making a Christmas theme so I chose ribbons with red and white and one with Ho Ho Ho written on it.  Wrap the ribbon around the can to determ the length (or use a tape measure) and then cut all your ribbons to that length. Heat seal the ends by running a lighter very quickly over the ends. You will see it melt a little bit. Don’t hold it too long or your ribbon will catch on fire.
Step 2:
Starting at the top and bottom of the can glue the ribbons on one at a time working your way to the middle. I chose E-6000 glue because it holds really well and doesn’t leave a stringy mess like my glue gun does. I put the glue where the ends will meet and a few random times around the can just to keep it from sliding around. 
 
Overlapping is okay if you ran out of space!
Step 3:
Add more ribbons to cover your ‘mistakes’. (There really are no mistakes while making this project!!)  If  you like the way your can is looking now you can skip this step.
 I knew I would be able to see where the dried glue is beneath the white satin ribbon and I dont like the way that looks.   I used it anyway because I wanted to use it as a border around the Ho Ho Ho ribbon.
 If you had to overlap in the middle, place another ribbon overtop to hide that. The solid red I used is actually the back side of  the Ho Ho Ho ribbon.
Step 4:
Cut one more peice of ribbon to cover all the ends. Heat seal the ends and glue in place.
Step 5:
This would be where you fill your can with holiday goodies to give to a friend. Or cut a slit in the lid to use as a piggy bank. Or put it on your desk as a cute pencil holder. I keep one on my washing machine to hold little things I find in pockets when I’m doing laundry.
There are so many things you can do. I would love to hear what you are going to do with yours!

Friday, November 25, 2011

Ribbon Christmas Tree Shirt

Christmas season is upon us! I am excited for all the family activities, holiday parties, and craft projects that we have planned.
The first Christmas project for me this year was a shirt for my baby girl- a ribbon Christmas tree shirt.
Gather supplies:
  • a variety of ribbon (different widths, textures, and colors)
  • scissors
  • scrap piece of paper cut in a triangle
  • shirt or onesie
  •  fusible web
  • thread and needle or sewing machine
Design your tree:
Decide if you would like a tall skinny tree or a short fat one and make a template out of a piece of paper.  With your assortment of ribbons that you selected lay them across your paper tree template and cut. Don’t forget to cut a little square or rectangle for the trunk.  Heat seal the ends of the ribbon with a lighter to prevent fraying.
Applique ribbons to shirt:
When I saw this ribbon shirt idea I thought I would just pin the ribbon down and sew them on. I tried. It was difficult for me to get the ribbons to line up where I wanted them so I used my paper template to cut a scrap piece of fusible web. The brand I used was Steam a Seam. I ironed the ribbons onto the fusible web and then onto the shirt.
Sew:
The bond is supposed to be permanent but I decided to stitch around each of the ribbons. I like the extra durability and the way it helps it stand out a bit more.  I think a zigzag stitch would look  super cute! Or you can do a straight stitch like I did or even hand stitch it. My sewing is far from perfect but it makes it unique. :)
Finishing Touches:
A Christmas tree is not complete without something on top. Sew on a star button or pretty bow. I am obsessed with bows so that is what I chose.
This top would look great paired with a tutu and a matching loopy bow using the same ribbons used for this project using the tutorials that I have shared in my other tutorials. Happy crafting and Happy Holidays!

Friday, November 18, 2011

Turkey Hairclip

Thanksgiving is right around the corner so I made this cute little turkey hairclip for my little turkey.
Gather Supplies
  • 3/8″ grosgrain ribbon (brown, orange, yellow, red)
  • 5/8″ ribbon (brown and orange)
  • ruler or measuring tape
  • scissors
  • lighter
  • alligator clip
  • hot glue gun
  • googly eyes (optional)
Line alligator clip
You can line the clip whatever color you chose. I went with brown to match the body of the turkey.  Cut the ribbon to the length needed (the clip length varies depending where you buy the clip).  Heat seal the ribbon by quickly running the lighter across the ends and hot glue in place. I only line the top prong, inside the ‘pinch’, and part way on the bottom.  I think the clip stays in hair much better without the bottom completely lined. If you need a more detailed step by step instruction of how to line the clip look back to my first tutorial on the simple hair clip and follow the first few steps. :)
Make the turkey body
Using the 3/8″ brown grosgrain ribbon cut 3 strips : 5 1/2″, 5″ and 4″ .
With the 5 1/2″  loop the ribbon to look like an awareness ribbon and hold in place with a drop of hot glue.
Glue the top of the loop down. Cut the ends at a slight angle and heat seal.
With the 5″ ribbon make a loop leaving a small tail at the end (about 1/4″).
Repeat with the 4″ ribbon  in the opposite direction.
Glue the smaller loop on the bigger loop.
Place a drop of glue on the small tails left on the body and attach the head.
Make the feathers
Cut five peices of ribbon to 3 1/2″. I cut two yellow, two a light orange, and one red. 
Glue each one into a little loop.
Glue the feathers to the body.
Make a cute face
Using 5/8″ orange cut a triangle for the beak. (heat seal all sides).
Cut a tiny scrap of the 3/8″ red in half to make the wattle.
Add two little googly eyes if you wish. 
This is optional because the eyes can fall off and become a potential choking hazard
so please be safe if you are making this for a baby or young child.
Finishing touches
Add a 1.5″ peice of brown to the back to help keep the feathers more secure.
Glue on the lined alligator clip.
And if you have some hot glue mess left on your turkey (I know I do!!)  peel it off once it is dry.

Friday, November 11, 2011

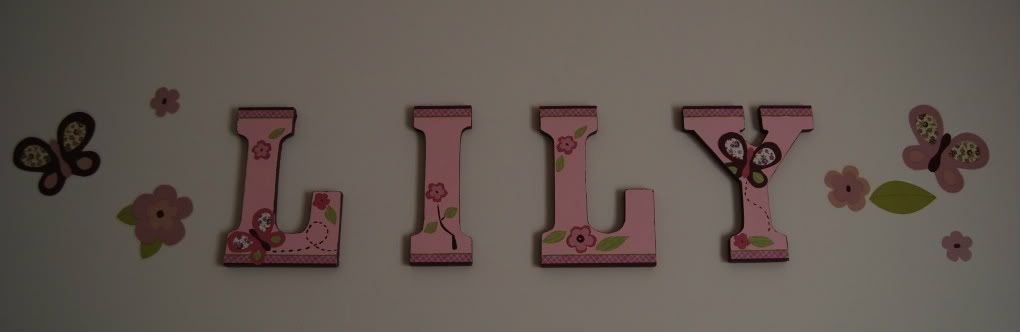
Nursery Wall Letters

If you are expecting a baby or looking for a way to decorate a child’s room this craft project is perfect for you.
 I bought the wall letters at Michaels and the paint at Lowes. The outside edges are painted the darker color because I like the way it gives the letters a little bit more dimension.
These letters were made to match the nursery bedding I picked out for my daughter’s nursery (CoCaLo Baby: Sugar Plum).  The secret to getting such a perfect match to the bedding is that the details on the letters are from the actual wall paper border from that collection.  Using an x-acto  knife I cut the decorative edge, flowers, leaves and butterflies out and then wall papered them to the letters just as if I was going to put them on the wall.
For finishing touches I used a little bit more paint to add the butterfly flight path and the flower stem to mimic the design on the bedding.


Friday, November 4, 2011

Loopy Bow

I have been having internet problems but I am back up and running again. :)

Here are my instructions for making this fun loopy bow.


Step 1: Gather supplies.
Ribbon
floral wire
 french barrette
scissors
lighter
Step 2: Take the spring out.
Step 3: Lay the ribbons out.
 Gather ribbons of different texture and size. I am using 5 ribbons in this bow. Two are satin, three are grosgrain and the widths are 3/8" and 5/8".   You can use as many or as few as you wish but I would recomend at least 3. Using more will give you fuller bow. Stack them on top of each other.
Step 4: Attach the ribbon to the barrette.
Use floral wire to wrap around your ribbon stack and the barrette.  I use a 26 gauge wire because it is thin and pliable but also strong.
 
Step 5: Make loops.
Make a loop roughly 2 inches high (I don't actually measure it) and secure in place with the wire by wrapping it around several times. I think it looks best when it is about the same height as the length I left on the end before I wrapped the wire around the first time.
Keep making loops and wrapping the wire around. Push them as close together as you can and try to keep the loops all uniform.
I fit 8 loops on this 2 inch barrette.
Step 6: Cut and heat seal the ends.
Finish the ends by cutting some at an angle and some in a 'V'. Then very quickly use your lighter to go over the edges so they do not fray.
Step 7:  Seperate the loops.
Use your fingers to pull the loops apart so they are no longer stacked. Make the order as random as possible.
Step 8: Reassemble the clip.
And you're done!